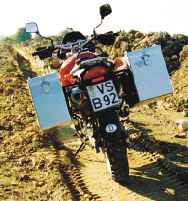
 These
rims are very light and strong. They use a exclusive 7000 series aluminum which
has a 50% greater yield strength compared to other manufacturers 6 series
aluminum.
These
rims are very light and strong. They use a exclusive 7000 series aluminum which
has a 50% greater yield strength compared to other manufacturers 6 series
aluminum.Making the F650GS Dakar off-road ready
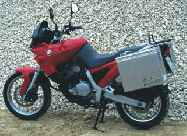
So, from my initial experiences off-road with the F650GS Dakar I had made a list of changes that I wanted made. The list included some major changes and some minor ones. Most of the changes I planned to make more or less followed Touratech's Schalber Rallye Replica bike.
List of changes
1. Excel Takasago rims (21" front, 18" rear),
drilled for 1 rim lock
2. Pirelli MT21 tires (90/90 21" front, 130/80 18"
rear)
3. Magura SX 81cm handlebar
4. Rear luggage rack (ala R100GS PD)
5. BMW rear top-case mounting rack
6. Touratech 35L Zega aluminum panniers w/Touratech luggage
rack
7. 'hardened' Garmin 3+ GPS w/Touratech mount
8. Touratech designed foot pegs, foot brake, and clutch change
levers
9. Staintune single sided exhaust
While this isn't the total list of changes that I wanted to make or made it more or less encompasses the major changes that I thought I needed before I went on the road and what was possible to do in a short period of time.
Detailed Change Information
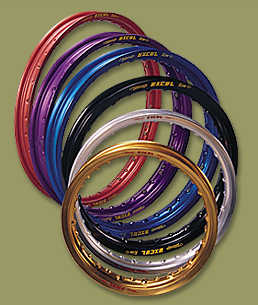
1. Excel Takasago rims
These
rims are very light and strong. They use a exclusive 7000 series aluminum which
has a 50% greater yield strength compared to other manufacturers 6 series
aluminum.
I figured that if these were good enough for the Paris-Dakar race and almost all other winning MX racing teams that they would be good enough for me.
As you can see they are available in different colors but I went with the basic black. Most US dealers who carry this rim only stock the chrome and everything else is special order.
I chose to get mine from Touratech as they delivered the rim with the BMW hubs and used extra-heavy duty spokes. This was the best and easiest way to go as the other dealers had nothing on the applications chart for the BMW F650.
Note - when changing the dimension of the rear wheel to 18" you will need to replace the standard BMW chain with an aftermarket brand as the BMW chain is not long enough to prevent the rear tire from hitting the inside of the swingarm.
This was learned the hard way destroying one tire in the process (within 30 miles) as when the rims and tires were first fitted to the bike it is not noticeable (i.e. it clears). However at highway speeds the tire heats up and elongates which causes the knobbies to hit and to be destroyed in the process.
It is not safe at all to ride with this condition and so when making this conversion be sure to make the whole change including the longer o-ring chain. You have been warned.
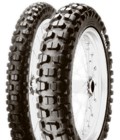
2. Pirelli MT21 tires (90/90 21" front, 130/80 18" rear)
 Before
starting the trip I was really concerned about which type of tires to take. I
knew that I wanted to have tires that would handle well in the dirt and sand but
also needed them to be able to take lots of highway miles. Thankfully,
some of the manufacturers have started to make tires which fit this
characteristicis.
Before
starting the trip I was really concerned about which type of tires to take. I
knew that I wanted to have tires that would handle well in the dirt and sand but
also needed them to be able to take lots of highway miles. Thankfully,
some of the manufacturers have started to make tires which fit this
characteristicis.
The PIRELLI MT 21 is a
street legal (DOT approved) enduro/trail tire designed for mainly off road use.
For two consecutive years the MT 21 Rally Cross has been chosen by one of
America's leading off road magazines "Dirt Bike" as the best choice
for dual purpose riders. The MT 21 with its MX designed tread pattern provides
stable on road handling and excellent off road performance, even over long
distances.
I also had to have a rear tire which fit the larger 18" rim for the rear.
Touratech runs the 18" on the rear to fit the 140/90 18" Michellin
Desert tire and because 18" rears are more common worldwide for
long-distance touring. With the MT21 I had a choice of 140/80 or 130/80 18"
rears. I went with the 90/90 21" 54R front (ID# 13461) and the 140/80
18" 70R rears (ID # 13508)
3. Magura SX 81cm handlebar (*please read the application notes)
You can see a picture of the Magura handlebar setup on the Schalber Rallye Replica. This one I sourced from my local dealer using the information from Touratech. It was a bit tricky though to be sure that it would fit the bike as nobody had done this before and there was not fitment information available.
First, every off-road shop normally stocks and sells the Pro-Taper bars. However I heard better things about the Magura bars and was determined to order them. I contacted Magura's USA distributor who was only somewhat helpful. They did however send me a fax of the specification sheet which enabled me to see the exact dimensions of the various bars available (there are 3).
Eventually I ordered both the SX bar and the EX bar to be able to see the differences. I went with the SX bar as it was straighter and better than the EX bar for my purposes.
The fax that I got from Magura is located here.
Note - When putting these on the F650GS you will need to get a set of universal clamps from ProTaper which run about $75.00. This is because the hole pattern and perches on the BMW triple clamp is different and will not directly accommodate this bar.
Note - Also, you will lose the extra smaller bar which is used to mount accessories or the crash pad. In order to compensate for this I ordered an accessory bar from Touratech USA which is made for other bikes such as the KTM or Africa Twin but which we found to work for the F650 and Magura bar combination.
Note - When fitting the Magura handlebars with the BMW heated grips you will have a few problems. One is that the bars will have to be notch-cut to accept the weighted ends of the BMW heated grips as well as to allow the passage of the heating element. The second is that you will not be able to mount the switch to control the heated grips as the perch for the bar does not allow this.
Again the amazing service team at CalBMWTriumph came through in figuring all of this out. They cut the bars and fitted an internal bolt/lock system that tightens as you turn it inward. They also took the heated grip switch from the older F650 which goes right into the newer wiring harness and fit this on the accessory bar. My many thanks to them for getting this done under a timetable which was nothing short of very tough.
4. Rear luggage rack (ala R100GS PD)

I've found that the solo seat setup and rear luggage rack on my R100GS PD is really flexible and great at holding stuff down with straps tied forward to back instead of bungee cords or nets. I had visions of my gear flying off as I bounced over the Baja and so before leaving I was on a quest (literally) to have a solo seat and luggage rack combination setup on my F650GS Dakar.
I talked to Touratech, Corbin, Wunderlich, Al Jessie, and CBT Imports (Top-of-the-line). All confirmed that the bike was too new to be considering anything yet but that they all had things in various stages of design. I figured that if they could design and manufacture something so could I.
I examined and measured the bike and found the there were only two good mounting points to put such a rack on. These were the side bag mounting points located on the side of the bike and on the rear frame. What we eventually wound up with was a design that was small and easy to take off - mounting to the bike with two screws. The only problem being that with the luggage rack on it would be necessary to take it off in order to have access to the compartment underneath the seat.
This I didn't figure to be a big problem because the only things underneath the seat are the tools and other maintenance items such as fuel tank, etc. I figured that if I needed to really be in that area of the bike that I would have the five minutes necessary to take off whatever I had on top and unbolt the two screws. In order to facilitate this I got a great wrench with a built-in ratchet to make this procedure easy. This I carry in my backpack so as not to lose it and it did come in handy on the trip.
I designed the strap loops to be wide enough to fit the excellent Touratech straps. I've made one of these so far using a local metal fabricator. The test of this rack was going to be the Baja. If I worked well I planned to manufacture it again using better welds and powdercoating it.
Note - If anyone wants one of these racks please contact me and I'm sure that we can make arrangements to have one made for you as well. The shop that I found it really great. They are true craftsmen and put this solution together quickly for me exactly to my specifications.
5. BMW rear top-case mounting rack
This was a minor modification but one well worthwhile making. The rear-top
case mounting rack can be bought without the top case. This then allows for the
use of straps to go through the various holes or for bungee hooks to have a
place to sit firmly.
While I feel that BMW should have made the GS Dakar more like the older R100GS PD in rear luggage setup from the beginning with the combination of my custom luggage rack and the BMW rear top case mounting rack I was beginning to feel more comfortable with the bike's luggage handling capabilities off-road.
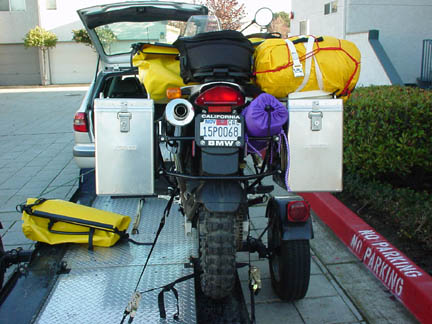
6. Touratech 35L Zega aluminum panniers w/Touratech luggage rack
This was a simple choice to make. The Touratech bags are lightweight (10 lbs. each empty) and strong. They are available with custom keyed integral locks as well as fitted with external padlocks. On top they have loops for straps and you can also drill them to accommodate other mounting points.
I bought mine pre-drilled for the F650GS Dakar as that was one less thing to have to worry about. These photos are from Touratech's web site and show the larger 41L case on the right side because of the older F650's asymetrical exhaust system. Touratech recommended getting the 35L cases which was fine by me.
I also got the bag liners (a good idea) and two extra straps to help carry them when not in the panniers. This also turned out to be a good idea later when I destroyed one of the bags in a fall and needed to attach it to the bike with the extra straps.

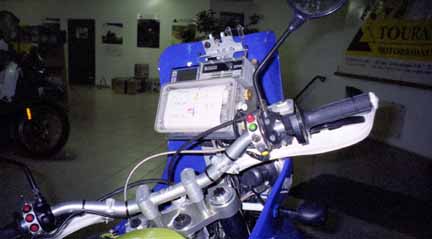
7. 'hardened' Garmin 3+ GPS w/Touratech mount
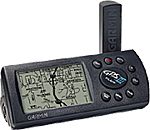

I hemmed and hawed over which GPS to get. The eTrek looked good and was inexpensive but I noticed that more of the serious rallye riders were using the Garmin III Plus so this is the model that I decided to get. There is so much information about GPS systems available on-line that it is easy to get confused. On top of it, I have GPS in my car and another system for my laptop when travelling so my own experiences came into play.
To my rescue though came the knowledgeable people at CycoActive. Since they sold GPS systems I decided to call them and see what they knew. I was determined to buy from the source with the best information not just the best price. They spent almost 45 minutes with me over the phone going over every nuance and question that I had. At the end, I felt convinced that the III Plus with vibration dampening and Touratech mount was the way to go.
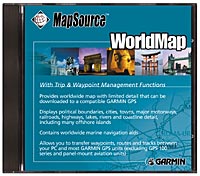
I picked up Touratech's software QuoVadis when I was in Germany but also ordered Garmin's MapSource software with Worldmaps for this trip as I didn't have enough time to learn and program QuoVadis (although I plan for it to be my major software application for GPS due to it's extended feature set and active motorcycle orientation).
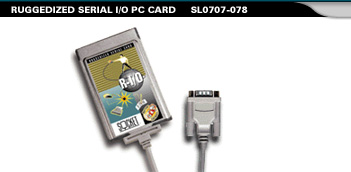
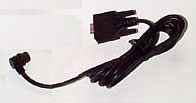
I knew that I ddn't want to bring alot of cables along so I also ordered the custom cable without the DB-9 connector. My plan was to splice this with the Socket Ruggedized Serial Card that I bought thus making a small and compact solution for transferring data between the GPS and the laptop (Sony PCG-C1VN). It was really important to me not to have the bulky DB-9 connectors as well as alot of extra cable.
Information on the pinouts was readily available on both the manuals for the Socket card and Garmin GPS available in PDF format. The hardest part was finding someone reliable to make the cable connections (with heat-shrink tubing) so I turned to an radio/scanner shop that I have done business with in the past, Scanners Unlimited. They did the work reasonably for about $40. Glen, the owner, is really nice to do business with and I'm very happy with their work.
Note - I've given Scanners Unlimited the info via PDFs so if anyone else wants to make this conversion I recommend using them as they've already done it.
Note - The Garmin cable pictured here is not the one to order. It's better to order the one without the DB-9 connector or you can use the one that comes with the unit, cutting off the DB-9 in the process.
8. Touratech designed foot pegs, foot brake, and gear change levers
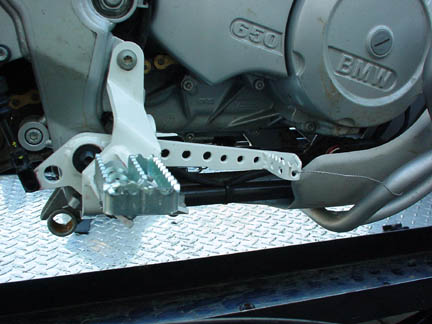
These were supposedly minor changes that I planned to make after Baja but my 600 mile break-in experiences quickly showed me otherwise that it was important to have these ready before I went.
These are simply parts which replace the BMW OEM parts. They change the position of the footpegs to be a bit further back giving better position when standing. They also are much stronger and the footpegs are wider without the rubber inserts. Grip from the footpeg to the bottom of the boot is much improved.
The gear change lever is now flexible with a springed hinge. This means when that big rock hits it it won't bend like a pretzel just give and return to a usable position. Eli at CalBMW Triumph also gave me a nice suprise when I picked up the bike as he took the initiative of installing "barkbusters". At the time I didn't know if these would come in handy but later doing through the brush in Baja I really came to thank him for having put these one.
Simply put for those of you who haven' seen this before these are twisted metal strands attached from the levers to the engine casing. They keep branches and twigs from getting caught between the lever and bending it outward as you ride through the scrub or forests. Really simple and great to have. I'll never go riding without them again!
9. Staintune single sided exhaust
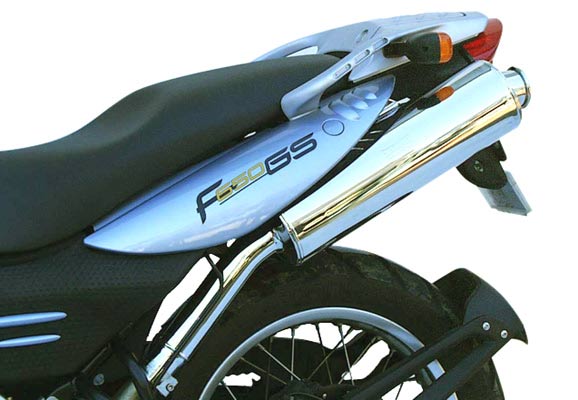
This was one of the last changes that I decided to make to the bike before Baja. While not imperative to make, I felt that the bike would handle better on the lower octane gas and sometimes leaded gas without the catalytic converter. There were two other ancilliary benefits as well to doing this work.
a) This would free up space on the right side of the bike which as it turned out would be perfect for putting the sleeping mat into. I got some "plumbers tape" from the hardware store along with some electrical tape and made a loop through which the sleeping mat went. This needed to be covered with electrical tape as the edges of the "plumbers tape" (actually flexible metal with holes in it) is fairly sharp and could puncture the air mattress roll.
The rolled-up mat went through this loop and rested on the topmost bar of the rear luggage rack. I put a bungee cord over the roll which attached the mat firmly to the bike. You can see this jury-rigged contraption in most of the bike photos (the sleeping mat is from BMW's older active line series and it's purple in color). It's simple to make, only cost a few bucks and saved a ton of room on the bike.
b) The unsprung weight of the bike is now much lighter. The removal of the stock exhaust system and replacement with the Staintune has helped in the weight department. Not by a whole bunch but any little bit helps.
Okay, there's one other benefit that I didn't mention - it also sounds much better...
Note - I have the OEM exhaust available for sale. As I'll never need it again I'm selling it very cheap. Just send me an e-mail and offer a price.
Author's notes:
Okay - this is enough information on the basic changes that I made to the bike before the trip. There really wasn't enough time even to get all of this done and other things such as changing the suspension didn't seem to make sense before I rode the bike extensively to see what I like and didn't like.
What I didn't mention here was that the yellow bags are Ortlieb dry-sacks and the other yellow bags are Oregon Research sacks. I tried several different combinations before the trip and changed it extensively during the trip. As always, less is more and I actually reduced my load twice during the trip sending back things that I didn't need to try to get down to the bare minimum. (which is why I took this trip anyways, as a shakedown trip for a larger trip).
I'm only mentioning this now as if you see the pictures of the equipment on the bike change that's because it did over time. For example, this picture shows the rear with the Touratech enduro bag on the back of the bike. Eventually, I got rid of this as it was too small to be of use and took up space that was better to lash a bigger bag on the back of the bike.